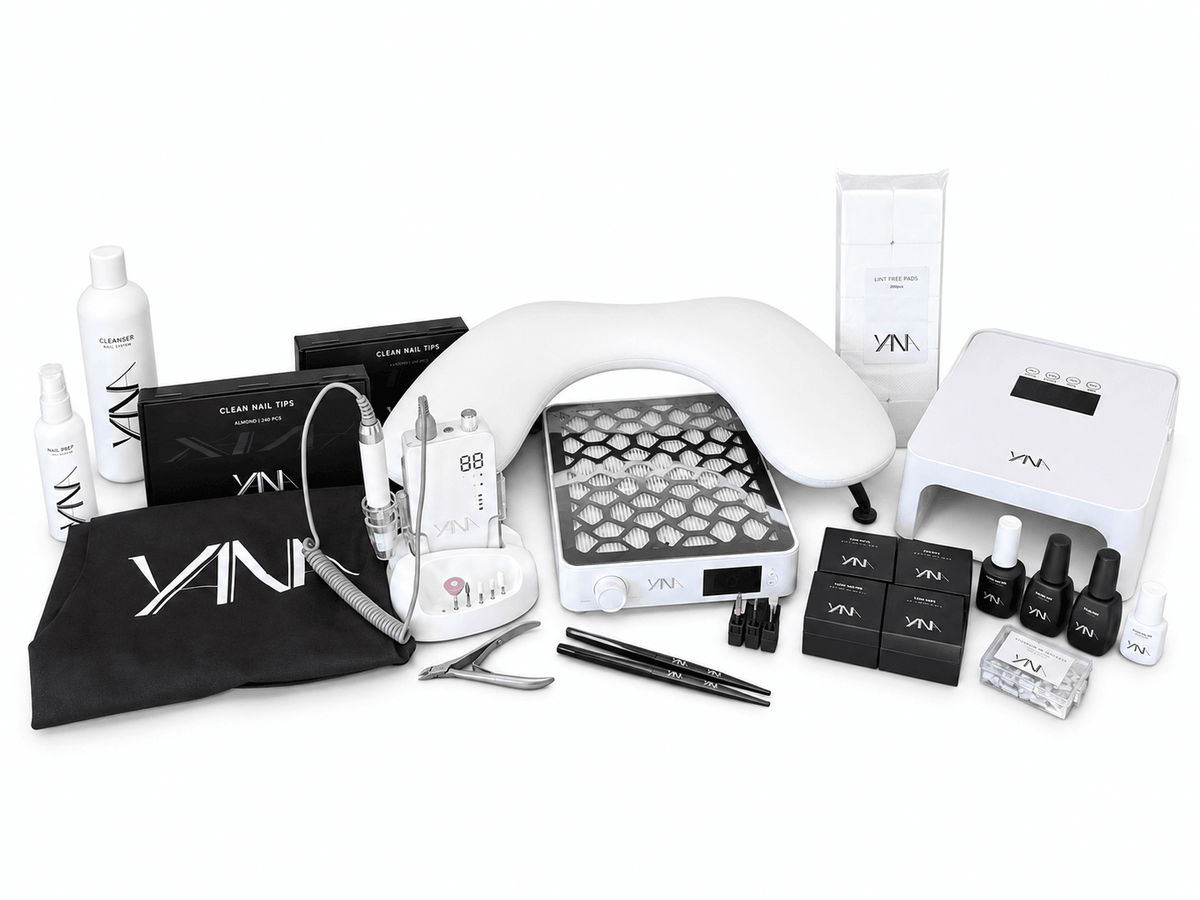
Complete Gel Starter Kit
Our Complete Gel Starter Kit is carefully curated with the products, tools, and equipment you actually need to get started with gel nails.
The kit also includes step-by-step instructions that show how the products are used together throughout the treatment. See instructions further down in the description.
The kit contains several of our best-selling products along with an electric nail file, dust collector, UV/LED lamp, ergonomic armrest, and salon apron, giving you a complete foundation for the entire treatment, from prep and application to filing, finish, refills, and removal.
It is perfect for home use when you want to do nails on yourself, but also for those who want to do nails on friends or start accepting clients.
By purchasing the products together in our Complete Gel Starter Kit, you also get a 16% lower package price compared to if the products were purchased separately.
Why we have chosen these specific products
• Carefully selected with only the products you actually need
• Includes several of our best-selling nail products
• Complete for prep, application, building, filing, and finish
• Suitable for both home use and for those who want to accept friends or clients
• Includes products for both refills and removal
• Step-by-step instructions included
• 16% lower package price compared to buying the products separately
What is included in the kit
Prep & preparation
• Primer
• Bonder
• Grip Crime Base Coat
• Multi-Mist
• Cleanser
• Lint Free Pads – 1000 pcs
• Cuticle Nipper
• 2 in 1 File & Buffer 180/240#
Electric file & bits
• Electric File
• Carbide Cone Removal Bit
• Carbide Cuticle Clean Bit
• Cleaning Brush Bit
• Sanding Bands Mini 180#
Gel & building
• Builder Gel Ryan
• Builder Gel Samuel
• Fiber Gel Fabian
Finish
Tips & nail glue
• Coffin Small Tips Clear
• Almond X-Small Tips Clear
• Nail Glue
Brushes
• Liner Brush 11
• Oval Brush 8
Equipment & workstation
• Dust Collector
• UV/LED Lamp
• Ergonomic Armrest
• Salon Apron Essential – black
Total: 26 products
How to use your starter kit
• Start with clean and dry hands.
• Prepare the area where the tip is to be attached by using the Sanding Bands Mini 180# together with the electric file on speed 1–2. Gently buff the free edge of the natural nail where the tip is to be placed.
• Measure the correct size of the tip. The tip should fit from sidewall to sidewall without needing to be forced into place. Apply a small amount of nail glue to the free edge, place the tip into the glue, and hold it in place for about 5 seconds. Shape the tip to the desired length and shape if necessary.
Prep
• Start the prep with the Carbide Cuticle Clean Bit on speed 1–2. Work carefully around the cuticles to clean the nail plate and remove dead skin.
• Then use the Sanding Bands Mini 180# on speed 1–2 to gently remove all shine from the natural nail. Also buff the tip and file down the transition between the tip and the natural nail so that it becomes smooth.
• Use the Cleaning Brush Bit on speed 1–2 to brush away all dust. Once the dust is gone, it becomes easier to see if there is skin left on the nail plate and what needs to be trimmed around the cuticles.
• Carefully trim away excess and dead cuticle with the Cuticle Nipper.
• Then spray MultiMist over the nail and use the Cleaning Brush Bit again to thoroughly clean the nail and remove remaining dust from the prep.
Bonder, Primer & Base
• Apply a thin layer of Bonder to the natural nail only and let it air dry for about 2 minutes.
• Then apply a thin layer of Primer to the natural nail only and also let it air dry for about 2 minutes.
• Pick up Grip Crime Base Coat with the Oval Brush 8 and apply a thin layer over the entire nail, including the tip. Cure in the UV/LED lamp for 60 seconds. Grip Crime will still have a sticky layer after curing; do not wipe it off, as it helps the gel applied on top to adhere properly.
Gel application
• Pick up a small amount of gel with the Oval Brush 8 and apply a slip layer over the entire nail. A slip layer is a very thin layer of gel that helps the next amount of gel move more evenly over the nail and makes the application easier to control. Do not cure the slip layer.
• Then pick up a larger amount of gel with the Oval Brush 8 and build up the nail's base shape and structure. Place more product where the nail needs strength and then work the gel out toward the free edge.
• Use the Liner Brush 11 to get close to the cuticles, along the sidewalls, and smooth out the gel where more precision is needed. Be careful not to get gel on the skin. If gel gets on the skin, it should be wiped off immediately with Cleanser and a Lint Free Pad before the nail is cured.
• When you are satisfied with a nail, you can perform a flash cure for about 5–10 seconds before moving on to the next nail. Flash cure means that you cure the nail very briefly to lock the gel in place so that it does not have time to run toward the cuticles or sidewalls. A flash cure does not replace a full cure, so when all nails are built, the entire hand must be cured for 60 seconds.
• If you find it difficult to control a larger amount of gel, you can instead build the nail in several thinner layers. Cure each layer fully before the next one is applied, but do not wipe off the sticky layer between layers as long as you continue building.
Filing & finish
• When you are finished with the gel application, apply Cleanser to a Lint Free Pad and wipe off the sticky layer.
• Use the file side of the 2 in 1 File & Buffer to shape the free edge and the front part of the nail. Use the buffer side around the cuticles and on areas where you want to work more carefully. Sanding Bands Mini 180# can also be particularly practical for reaching and smoothing the area around the cuticles.
• Finish the filing by buffing the entire nail to get an even and smooth surface that the top coat can lie nicely on.
• Spray MultiMist over the nail and use the Cleaning Brush Bit again to thoroughly clean away all filing and buffing dust.
• Apply an even layer of Shine Crime Top Coat over the entire nail and cure in the UV/LED lamp for 60 seconds.
• Done!
Refill
• For refills, use the Carbide Cone Removal Bit to remove color and reduce the thickness of the existing material. If you are new to the electric file, we recommend that you start at speed 5–7. When you feel more comfortable, you can gradually work at about speed 15–20.
• Always check for any lifting before refilling the nail. Lifting is often visible as a lighter area in the gel, where the material is no longer stuck to the natural nail. All material that has lifted must be removed before new product is applied. You can use, for example, a hand file or Sanding Bands Mini 180# for this.
• Once old material and any lifting are removed, prep the outgrowth and then follow the regular guide from there.
Removal
• For full removal, use the Carbide Cone Removal Bit to remove about 80% of the material. Avoid filing all the way down to the natural nail with the removal bit.
• Then carefully remove remaining material with a hand file or Sanding Bands Mini 180# and finish with the buffer side of the 2 in 1 File & Buffer to smooth the nail and carefully remove the last remnants.
• Always work gently near the natural nail to avoid over-filing.
- Free shipping over 999 SEK
- Handled same day
- 14 day return policy
Couldn't load pickup availability